Our Easter Tomb
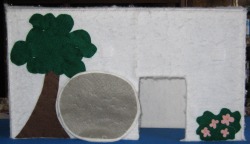
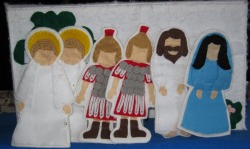
Years ago I made a nativity set out of felt that could hang on the tree and be played with by small children without worry. Shortly after, I started my crusade for bigger Easter's in my family. I wanted to have a tomb that my kids to play with and be used all weekend. It is sturdy plastic canvas covered in felt. This, again, was supposed to be used by small children, but something I could use year after year.
Friday night we put Jesus in the tomb.
In the future, as my kids get older, I want to talk more about the trial of Jesus, by the Pharisees and then the Roman leaders. I also want to incorporate what was happening in the new world, the storms, turmoil and 3 hours of darkness.
Make Your Own Easter Tomb
 |
 |
Materials:
Three paper plates
Things to decorate your tomb (gray, brown, green construction paper, flower/insect stickers)
Brads (Brass Fasteners)
Packing tape
Yarn or string
Stapler
White glue
Easter Characters page
Easter Scriptures page (Optional. You can simply write the scriptures on the back of the characters if you want.)
Tomb instructions page
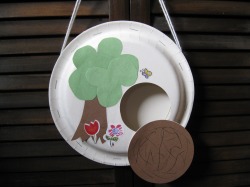
1. Cut a three inch hole in the first paper plate. This is the opening of the tomb.
2. With another paper plate cut a four inch circle out to cover the three inch hole. This is your stone.
3. Attach your stone to the tomb opening with the brad (brass fastener). Cut a four inch circle from brown or gray construction paper and cover your stone circle.
4. Decorate your tomb with a tree, flowers, and insects. Cover your decorations with packing tape. You will stick your characters to your tomb and you don't want the decorations to get ruined.
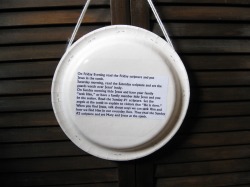
5. Cut the tomb instructions to fit on the back of the your last plate. Glue in place and then cover with packing tape. This is where you will keep your characters.
6. Cut about 15" of yarn or string. Glue the ends to the 10 o'clock and 2 o'clock positions of your bottom/back plate.
7. Staple the two plates together.
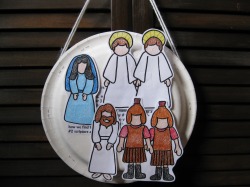
8. Print out the Easter characters. Turn your paper over and print the scriptures on the back (optional).
9. Color and cut out the characters. Cover the scriptures on the back with packing tape.
10. Use regular scotch tape to attach your characters to your tomb as you act out the story.
Three paper plates
Things to decorate your tomb (gray, brown, green construction paper, flower/insect stickers)
Brads (Brass Fasteners)
Packing tape
Yarn or string
Stapler
White glue
Easter Characters page
Easter Scriptures page (Optional. You can simply write the scriptures on the back of the characters if you want.)
Tomb instructions page
1. Cut a three inch hole in the first paper plate. This is the opening of the tomb.
2. With another paper plate cut a four inch circle out to cover the three inch hole. This is your stone.
3. Attach your stone to the tomb opening with the brad (brass fastener). Cut a four inch circle from brown or gray construction paper and cover your stone circle.
4. Decorate your tomb with a tree, flowers, and insects. Cover your decorations with packing tape. You will stick your characters to your tomb and you don't want the decorations to get ruined.
5. Cut the tomb instructions to fit on the back of the your last plate. Glue in place and then cover with packing tape. This is where you will keep your characters.
6. Cut about 15" of yarn or string. Glue the ends to the 10 o'clock and 2 o'clock positions of your bottom/back plate.
7. Staple the two plates together.
8. Print out the Easter characters. Turn your paper over and print the scriptures on the back (optional).
9. Color and cut out the characters. Cover the scriptures on the back with packing tape.
10. Use regular scotch tape to attach your characters to your tomb as you act out the story.
| easterscriptures.pdf |
| eastercharacters.pdf |
| tombinstructions.pdf |
